
I’m using the magic loop for a few of the designs that I’m thinking of at the moment so I thought I’d put up a tutorial for how I do it.
This is a crochet tutorial, for a technique used to start crocheting “in the round”, for example when making a mandala or some amigurumi. Please don’t confuse it with the magic-loop knitting technique!
Magic Loop Vs Starting Chain
Some patterns will advise starting with a chain, closed with a slip stitch. Generally, you could substitute this for magic loop if you wanted to. The only time this might not be advisable is if your pattern has a large number of stitches made in the starting chain as you might need the extra space allowed by a starting chain.
In this picture below you can see the difference, on the left is a magic loop and on the right is a starting chain 5 (you can start with fewer chains to make the hole smaller, but you do need enough to be able to crochet into). Both are right, and both are good in their own way, they just look different!

How to make a magic loop for crochet
There are a lot of variations so this isn’t the only (or even best!) way, it’s just the way that works for me! (please excuse the very RED nail-polish in the pictures below, I’ve no idea what I was thinking!!!)
Step 1
Holding the tail yarn, wrap twice around two fingers, so that the working yarn is behind your hand and the tail yarn is at the front.

Step 2
Holding the tail yarn under your ring finger (to keep it tight), turn your hand over and pull the first wrap under the second wrap. [note, you will also need to tension the working yarn so that you can “work it”, I wrap it round my little finger to do this]


Step 3
Chain the number of stitches required by your pattern using the tensioned working yarn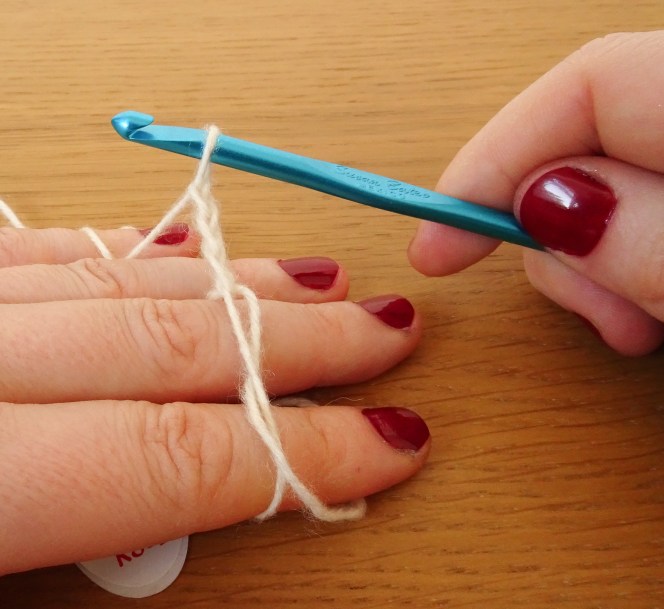
Step 4
At this stage I like to slip the loop off my fingers, so I can hold my work a bit more “normally” to work the stitches

Note: Be careful when you work your first stitch into the magic-loop that you don’t twist the starting chain

Step 5
Your pattern will advise how many stitches to “work” into the loop. Make sure you work over both the working and tail yarns to secure the tail. Once you have completed the first row, unless your pattern says otherwise, you can pull on the tail yarn to close the loop.

And that is it, you’ve now created the magic loop and can continue hooking your pattern!
Hope this helps!
Jo
x
