
Welcome back to my Learn to Knit for Beginners course. You’ve made it to Lesson 6, well done! In this lesson we’re going to learn about how to increase knitting stitches and how to decrease knitting stitches.
That basically means we’re going to look at how to add or reduce the number of stitches using techniques like “Make 1 Left (M1L)”, “Make 1 Right (M1R)”, “Knit front and back (KfB)”, and “Purl two together (P2tog)”, “Knit two together (K2tog)”, “Slip Slip Knit (SSK)”.
Sound like gobbledygook? Don’t worry, by the end of the lesson you’ll understand these terms and how to make them to make increases or decreases in your knitting.
If you missed previous lessons, you can find them all here.
So, let’s get on with it! 🙂
Why do I need to increase or decrease?
We use increases or decreases to increase the number of stitches that you have on your needles. This will, in turn, increase the width of your knitting.
You’ll use these techniques when knitting clothing like jumpers and cardigans, to change the shape of what you are knitting. For example, around your waist, or bust. You will also use it any time you want to shape any piece of knitting.
For example, ever fancied knitting some toys? You will need to increase or decrease to make your knitting “shaped”.


Lets start with How to Increase Knitting Stitches
Your pattern will usually tell you what sort of increase or decrease stitch to use. If it doesn’t, just pick your favourite! I’m going to show you several techniques for how to increase knitting stitches and will help you add stitches to your work.
Knit Front and Back (KfB) and Purl Front and Back (PfB)
This is the easiest (in my opinion) way to increase a stitch. It simply involves knitting or purling the same stitch twice.
How to Knit front and back (KfB)
These are increases made on the knitted side of your work. To make this, you will knit the same stitch twice. Once through the front loop and once through the back loop.
It’s really simple, the steps you will make are as follows:


You now have one extra stitch. The next time you come to this extra stitch, you will just knit or purl it as normal!
How to Purl front and back (PfB)
These are increases made on the purl side of your work. It is exactly the same as KFB, in that you will Purl through the same stitch through the front and then back loop.
The steps are as follows:


oohh, one extra stitch has been made yay!. Like for K2tog, next time you come to this extra stitch, you will just knit or purl it as normal!
How to Make 1 Left (M1L) and Make 1 Right (M1R)
These are increases made on the knitted side of your work.
To make a M1L or a M1R, you will use this “bar” between two stitches. It effectively adds a stitch by knitting this “bar” as if it was a stitch.

Step 1 in either a M1L or M1R is to pick this “bar” up. Whether you pick up from the front or the back will determine whether the stitch “leans” to the left or to the right.
How to Make 1 Left (M1L)


How to Make 1 Right (M1R)


How to remember whether it is a M1L or M1R
There are two ways to remember this. The first one is that you make a M1R by picking up from the REAR (Right / Rear).
The other way is by looking at the “bar” you have picked up. In a M1R , it will lean to the right and in a M1L it will lean to the left. As I’ve shown below! 🙂

Now lets look at how to decrease knitting stitches
Now lets look at how to decrease knitting stitches. These techniques will help you reduce the number of stitches that you have. Your pattern will usually tell you which to use, if not, pick your favourite!
How to Knit two together (K2tog)


And that’s it, you’ve decreased one stitch.
How to Purl two together (P2tog)
Purl two together is the same as knit two together, but on the purl side. To reduce a stitch on the purl-side in this way you will carry out the following steps:


There you go, one stitch reduced on the purl side! 🙂 simple huh?
How to Slip Slip Knit (SSK)
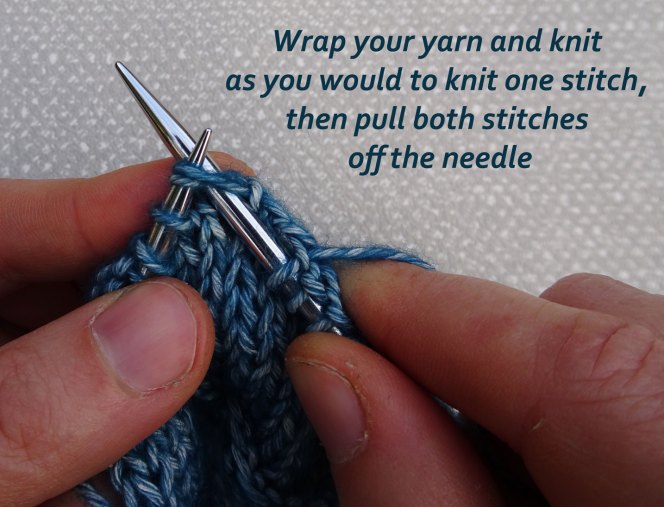
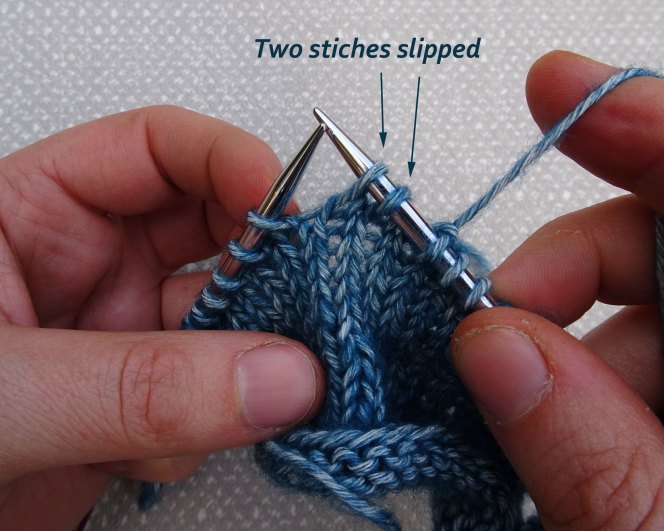
Like most knitting stitches, “Slip Slip Knit (SSK”), describes what you do…to reduce a stitch this way, you will carry out the following steps:
Slipping “knitwise” simply means putting your needle under the stitch as if you were going to knit it, but not knitting it, instead sliding it onto the right-hand needle. As shown in the picture below.


woohoo, one stitch down using SSK! nice! 🙂
Why use SSK and K2tog?
When you’re following a pattern, you might find that the design uses SSK at one “side” of the row / item and K2tog at the other end. Like M1L and M1R, this is because SSK “leans” to the left and K2tog “leans” to the right.
For example, if we look at my Freddie the Field Mouse pattern, you will see that his body decreases slant each side.

I am here to help!
So that’s it for Lesson 6! I hope that you’ve enjoyed learning how to increase knitting stitches and how to decrease knitting stitches. You should now understand how to change the number of stitches you have per row (deliberately!)
Join me in the final lesson, Lesson 7, we’ll look at “blocking” knitting to make it the right shape or size. We’ll also learn how to knit “in the round” using circular needles or double-pointed needles. We’ll also explore cable knitting, it really is much simpler than you might think!
Whether you are knitting the pattern I’ve shared, or another pattern, if at any point you have any issues, question, comments, please post them either below in the comments section, or you can find me on facebook here or here. I really am here to help so please don’t struggle in silence. If you are struggling with something, chances are that someone else is too, so think of it as helping them!! 🙂
Please show me how you’re getting on!
I’d really love to see what you’re up and I know you can’t add pictures to the comments on my blog so:
If you’re on facebook – please share them on my facebook page Jo Creates Facebook Page or if you’re sharing them in your own newsfeed, please tag me so I can see what lovely knits and purls you are making!
If you’re on instagram, please post pictures of your knitting practice using the hashtag #learntoknitjocreates.

Great instructions – I love the visuals! I especially love your yarn colors. The blue in the samples is great, but the variegated purple in the header image is awesome!
thank you! 😊
Wow, these are great instructions with very clear and detailed photos! I’m impressed! And the toys are adorable 🙂
thanks. it’s hard to make clear but I’m trying so hard to do that. glad it’s ok! 😊😊 thanks. love my “knitamals”
Definitely clear and very informative, great job!
Sorry for being dim, but I don’t understand the last step for SSK. How do you finish it off once the left needle is through the two slipped stitches?
hello. I’m sorry. bad explanation. I’ll improve it. basically, once you have inserted your left needle through the two back stitches you can wrap the yarn around your right needle and pull through as you would to knit a stitch. it ends up being a bit like knitting them through the back loop. does that make sense?
the best way to look at it is to ignore the fact you have just inserted the left needle. if you look at how your needles are are arranged, it’s just as if you had inserted the right-hand needle through the back loop of both stitches. I think it’s confusing because it feels backwards!